How do you protect your website content? If you run a WordPress site, one simple way to safeguard your work and strengthen data protection is by disabling right-click to prevent easy copy-paste. ...

10Nov


WordPress is content management system that powers more than 41% of all websites on the Internet and as a CMS, it is installed on more than 60% of the market share for CMSs.
Before you install WordPress, you will need a domain name and a good web hosting company that knows the requirements for WordPress to ensure that the installation process goes on smoothly.
Here, we are going to tackle the installation process on cPanel using the Softaculous app. The cPanel is a popular software used by many web hosting companies that provides website owners with a simple web-based interface to manage their hosting account. It is a one-stop access to several useful utilities including auto-installer scripts that help your install WordPress.
Note: Hosting companies decide which auto-installer script to use when installing WordPress but the most popular options are Softaculous, QuickInstall, MOJO Marketplace and Fantastico.
This is the most popular of the available auto-installing scripts for popular web applications including WordPress. Therefore, most hosting companies have it in their control panel.
First, login to your cPanel account and look for Softaculous or WordPress installer icon. To login to cPanel, you can either using the https://example.com/cpanel or https://example.com:2083. This can be found in the Software section of the cPanel or in the Auto Installers section.

Clicking on any of these icons will launch Softaculous auto-installer for WordPress. First, you will see an overview of WordPress. You need to click on the Install tab to continue.
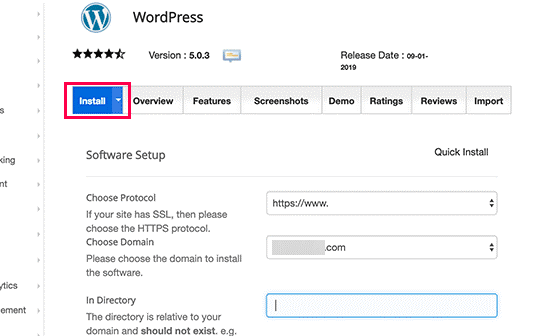
Softaculous will now ask you where you want to install WordPress. You need to choose http:// or http://www. as protocol.
Note: If your site has SSL and HTTPS, then you can select https:// or https://www. as protocol. Always ensure that you have a security certificate for your website as it builds customer confidence and trust but also is for securing the communication from and to your webserver where your website is stored.
Choose the Domain Name where you want to install WordPress. Most users want to install WordPress in their domain’s root directory, like example.com. In that case, you need to make sure that the ‘In Directory’ field is blank/empty.
Note: If you create a folder in the ‘In Directory’, you will install WordPress in that directory making it only accessible when the folder is included in the URL. For example, creating a folder called ‘Home’, in example.com will result in your WordPress website being installed and accessed at example.com/home instead of the default example.com when the ‘In Directory’ is left blank which is what you should do: leave it empty/blank.
After providing the protocol (http or https) and the directory where to install, the section below that allows you to set security parameters related to the WordPress installation as shown below.

Under this section, first you need to provide a title and description for your WordPress site. These can also easily be changed from your WordPress admin area after installation.
Choose an admin username, password, and email address. Change the username from the default admin as provided as it poses a security risk.
Note: Softaculous will automatically fill in the username and password fields for you. It will use a non-dictionary word for username and a strong password.
Still, it is advisable to change to words you can remember for the username and a strong password (minimum 12 alphanumeric and symbols) to manage login into the WordPress admin area.
Make sure that you enter correct email address in the admin email field.This is where WordPress will send notifications and password reset link if you ever forgot your password.
We recommend using the free email provides like Gmail for such services. Do not use the default email that Softaculous has provided and losing access to the site might result to being denied access even to the email facility of the website.
Rest of the options on the screen are optional as shown below.
You can now click on the install button to run the installer.

In the Advanced Options section, you don’t need to change anything but features included here are the database name, table prefix, disable update notification emails, set auto-upgrade and more.
Softaculous will run the installer using the settings you provided. You will see a progress bar with installation status. It will take a couple of minutes. Do NOT close the window shown below until the progress bar reaches 100% otherwise, this may affect your WordPress installation.
The Select Theme allows you to select a theme to use for your website. By default, WordPress uses a theme named after that year, but you can choose one that fits the purpose of your website or, later on, upload your own theme and install it.

You will see a success message after the installation is finished. It will also show you links to your website and to your WordPress admin area.
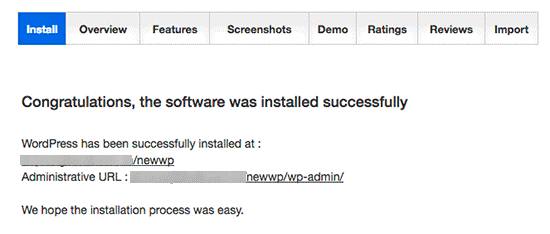
And with the installation successfully done, you can now access the new website, which will show the current theme installed or login into the administrative area or backend of your website to configure and customize the different settings.


Thank you for your sharing. I am worried that I lack creative ideas. It is your article that makes me full of hope. Thank you. But, I have a question, can you help me?
Your point of view caught my eye and was very interesting. Thanks. I have a question for you.
Your point of view caught my eye and was very interesting. Thanks. I have a question for you.
Thank you for your sharing. I am worried that I lack creative ideas. It is your article that makes me full of hope. Thank you. But, I have a question, can you help me?
How to Install WordPress – Sino Soft Classifieds
https://sinosoft.guru/knowledgebase/22/How-To-Install-WordPress—WordPress-Installation-Guide.html

Thank you for your sharing. I am worried that I lack creative ideas. It is your article that makes me full of hope. Thank you. But, I have a question, can you help me?